The documentation set for this product strives to use bias-free language. For the purposes of this documentation set, bias-free is defined as language that does not imply discrimination based on age, disability, gender, racial identity, ethnic identity, sexual orientation, socioeconomic status, and intersectionality. Exceptions may be present in the documentation due to language that is hardcoded in the user interfaces of the product software, language used based on RFP documentation, or language that is used by a referenced third-party product. Learn more about how Cisco is using Inclusive Language.
This document describes the troubleshooting methodology necessary to examine issues faced when you access/configure the Cisco ASA with Cisco ASDM.
The scenarios, symptoms, and steps listed in this document are written for troubleshooting issues after the initial configuration is set up on the Adaptive Security Appliance (ASA). For the initial configuration, refer to the Configuring ASDM Access for Appliances section of the Cisco ASA Series General Operations Adaptive Security Device Manager (ASDM) Configuration Guide, 7.1.
This document uses the ASA CLI for troubleshooting, which requires Secure Shell (SSH)/Telnet/Console access to the ASA.
The information in this document is based on the ASA and ASDM.
The information in this document was created from the devices in a specific lab environment. All of the devices used in this document started with a cleared (default) configuration. If your network is live, ensure that you understand the potential impact of any command.
ASDM delivers security management and monitoring services for security appliances through a graphical management interface.
There are three major failure points on which this troubleshooting document focuses. If you adhere to the general troubleshooting process in this order, this document can help you to determine the exact problem with ASDM use/access.
There are three essential configurations that are present on the ASA that are needed in order to successfully access the ASDM:
Make sure that the required version of the ASDM is uploaded to the flash. It can either be uploaded with the currently run version of the ASDM or with other conventional methods of file transfer to the ASA, such as TFTP.
Enter show flash on the ASA CLI in order to help you list the files present on the ASA flash memory. Check for the presence of the ASDM file:
ciscoasa# show flash --#-- --length-- -----date/time------ path 249 76267 Feb 28 2013 19:58:18 startup-config.cfg 250 4096 May 12 2013 20:26:12 sdesktop 251 15243264 May 08 2013 21:59:10 asa823-k8.bin 252 25196544 Mar 11 2013 22:43:40 asa845-k8.bin 253 17738924 Mar 28 2013 00:12:12 asdm-702.bin ---- ASDM Image
In order to further verify if the image present on the flash is valid and not corrupt, you can use the verify command in order to compare the stored MD5 hash in the software package and the MD5 hash of the actual file present:
ciscoasa# verify flash:/asdm-702.bin
Verifying file integrity of disk0:/asdm-702.bin
.
Done!
Embedded Hash MD5: e441a5723505b8753624243c03a40980
Computed Hash MD5: e441a5723505b8753624243c03a40980
CCO Hash MD5: c305760ec1b7f19d910c4ea5fa7d1cf1
Signature Verified
Verified disk0:/asdm-702.bin
This step can help you verify if the image is present and its integrity on the ASA.
This process is defined under the ASDM configuration on the ASA. A sample configuration definition of the current image that is used looks like this:
asdm image disk0:/asdm-702.bin
In order to further verify, you can also use the show asdm image command:
ciscoasa# show asdm image
Device Manager image file, disk0:/asdm-702.bin
This step is essential in the ASDM configuration because it defines which networks have access to the ASA. A sample configuration looks like this:
http server enable
http 192.168.1.0 255.255.255.0 inside

http 10.0.0.1 255.0.0.0 outside
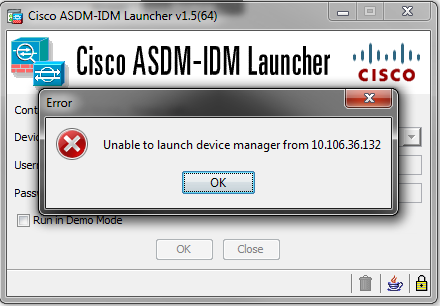
Verify that you have the necessary networks defined in the previous configuration. The absence of those definitions causes the ASDM launcher to time out while it connects and gives this error:
The ASDM launch page (https:///admin) causes the request to time out and no page is displayed.
Further verify that the HTTP server uses a non-standard port for ASDM connection, such as 8443. This is highlighted in the configuration:
ciscoasa(config)# show run http
http server enable 8443
If it uses a non-standard port, you need to specify the port when you connect to the ASA in the ASDM launcher as:
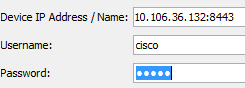
This also applies for when you access the ASDM launch page: https://10.106.36.132:8443/admin
After you complete the previous steps, the ASDM can open if everything is functional on the client side. However, if you still experience issues, open the ASDM from another machine. If you succeed, the issue is is probably at the application level, and the ASA configuration is fine. However, if it still fails to launch, complete these steps to further verify the ASA-side configurations:
ciscoasa# show run all ssl
ssl server-version any ssl client-version any
ssl encryption rc4-sha1 aes128-sha1 aes256-sha1 3des-sha1 permitted on the ASA
If there are any SSL cipher negotiation errors while the ASDM launches, they display in the ASA logs:
%ASA-7-725014: SSL lib error. Function: SSL3_GET_CLIENT_HELLO Reason:
no shared cipher
%ASA-6-302014: Teardown TCP connection 3 for mgmt:10.103.236.189/52501 to
identity:10.106.36.132/443 duration 0:00:00 bytes 7 TCP Reset by appliance
If you see specific settings, revert them to the default. Notice that the VPN-3DES-AES license needs to be enabled on the ASA for the 3DES and AES ciphers to be used by the ASA in the configuration. This can be verified with the show version command on the CLI. The output displays like this:
Protocol Socket Local Address Foreign Address State
SSL 0001b91f 10.106.36.132:443 0.0.0.0:* LISTEN
aaa authentication http console LOCALRemember to create a username/password when you enable the previous command:
If none of these steps helps, these debug options are available on the ASA for further investigation:
debug http 255
debug asdm history 255
If you have completed the previous section and are still unable to access the ASDM, the next step is to verify the network connectivity to your ASA from the machine from which you want to access the ASDM. There are a few basic troubleshooting steps in order to verify that the ASA receives the request from the client machine:
In order to configure a capture, use this command:
capture asdm_test interface match tcp host
 eq 443 host
For example, cap asdm_test interface mgmt match tcp host 10.106.36.132
eq 443 host 10.106.36.13
This captures any TCP traffic that comes for port 443 on the ASA interface from which you connect to the ASDM. Connect via ASDM at this point or open the ASDM web launch page. Then use the show capture asdm_test command in order to view the result of the packets captured:
ciscoasa# show capture asdm_testThis capture shows a synchronize (SYN) request from the client machine to the ASA, but the ASA sends no response. If you see a capture similar to the previous one, it means that the packets reach the ASA but the ASA does not respond to those requests, which isolates the issue to the ASA itself. Refer to the first section of this document in order to troubleshoot further.
However, if you do not see output similar to the previous and no packets are captured, it means that there is a connectivity problem between the ASA and the ASDM client machine. Verify that there are no intermediary devices that can block TCP port 443 traffic and that there are no browser settings, such as Proxy settings, that could prevent the traffic from reaching the ASA.
Typically, packet capture is a good way to determine if the path to the ASA is clear, and if further diagnostics cannot be needed to rule out network connectivity problems.
This section describes how to troubleshoot the ASDM launcher software that has been installed on the client machine when it fails to launch/load. The ASDM launcher is the component that resides on the client machine and connects to the ASA in order to retrieve the ASDM image. Once retrieved, the ASDM image is usually stored in cache and is taken from there until any changes are noticed on the ASA side, such as an ASDM image update.
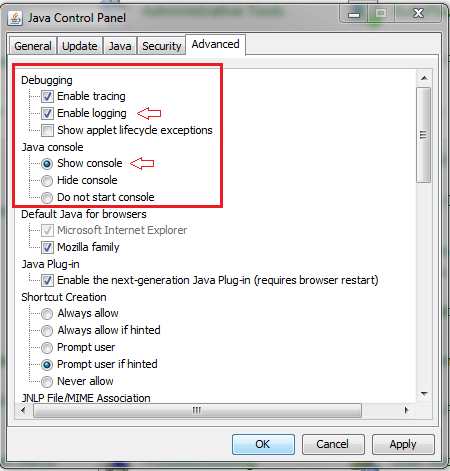
Complete these basic troubleshooting steps in order to rule out any issues on the client machine:
This procedure helps determine any Layer 7 issues for the HTTP channel. This information proves useful when you are in a situation where the ASDM application itself is not accessible, and there is not any CLI access available to manage the device.
The URL that is used to access the ASDM web launch page can also be used to run any configuration-level commands on the ASA. This URL can be used in order to make configuration changes at a basic level to the ASA, which includes a remote device reload. In order to enter a command, use this syntax:
If there is a space in the command, and the browser is unable to parse space characters in a URL, you can use the + sign or %20 to indicate the space.
For example, https://10.106.36.137/admin/exec/show ver results in a show version output to the browser:
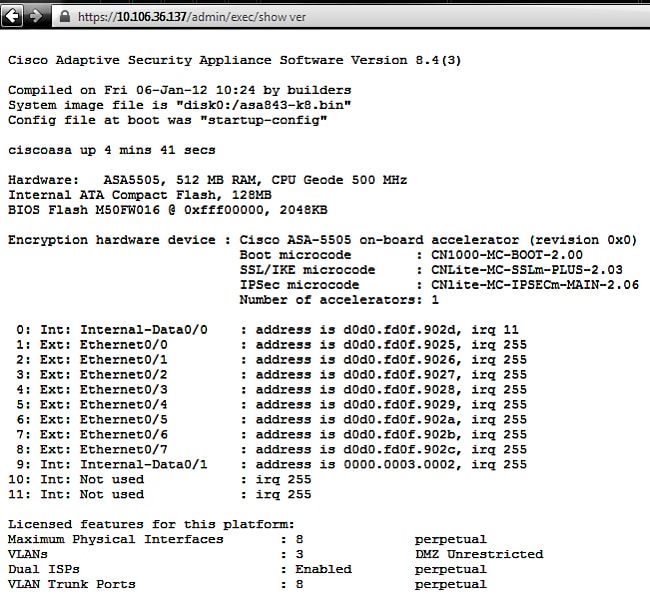
This method of command execution requires that the HTTP server is enabled on the ASA and has the necessary HTTP restrictions active. However, this does NOT require an ASDM image to be present on the ASA.